Exterior Lighting Controls
Unless otherwise noted below, press the upper half of the dash switch to turn the desired light(s) on or off.
Turn Signals
The turn-signal lever is mounted on the left-hand side of the steering column. Pulling the turn-signal lever up activates the right-turn signal; pushing it down activates the left-turn signal. The lever is typically a non-canceling combination turn-signal, windshield wiper/washer switch, and high beam headlamp control unit. See Fig. .

-
Headlight Control Symbols
-
Windshield Wiper Switch
-
Windshield Washer Switch
-
Turn Signal Symbol
Fig. 1, Windshield Wiper/Washer Controls
When a turn signal is activated, a green telltale lamp flashes on the instrument panel.
On a self-canceling turn signal lever, the lever automatically returns to the neutral position when the steering wheel returns to the straight-ahead position after a turn.
Headlamp Switch
The headlamp switch is a rotary switch located to the left of the steering column, above the ignition switch. See Fig. .

-
Fog lamps (optional)—Activate by pulling the switch out when the marker lamps or headlamps are on.
-
Automatic Headlamps
-
Off
-
Marker lamps
-
Headlamps
Fig. 2, Headlamp Switch
High-Beam Headlamps
With the low-beam headlamps on, push the turn-signal lever away from you to turn on the high-beam headlamps. See Fig. . To turn off the high-beam headlamps, pull the lever to the middle position.
With the low-beam headlamps on, pull the lever towards you to flash the high-beam headlamps momentarily.
When the high-beam headlamps are on, a blue telltale illuminates on the instrument cluster.
Note: The ignition switch must be on for the high beams to work.
Automatic Headlamps
If the vehicle is equipped with a rain-light sensor and the headlamp switch is in the 'A' position, the low beam headlamps and all exterior lamps activate when the outside light decreases to a pre-set level. See Fig. .
Some vehicles may have a feature that automatically turns on the headlamps if the windshield wipers are on and the vehicle is moving faster than 10 mph (16 km/h). At speeds from 10 to 40 mph (16 to 64 km/h), cycling the headlamp switch turns the headlamps off.
Intelligent High-Beam Headlamps
The intelligent high-beam headlamp feature activates when the headlamp switch is in the 'A' position and the turn signal lever is pushed away from the driver in the high-beam position. See Fig. and Fig. .
When a vehicle approaches from the opposite direction, the high-beam headlamps deactivate and the low-beam headlamps activate. The high-beam headlamps activate again when there are no vehicles approaching from the opposite direction.
Auxiliary High Beam Lamps
If present, auxiliary high-beam lamps are located in the front bumper. To activate the auxiliary high beam lamps, press the upper part of the dash switch. The auxiliary high beam lamps illuminate only when the high-beam headlamps are on. They switch off temporarily when the low-beam headlamps are on, until the high beams are on again. Press the upper half of the switch to deactivate the auxiliary high beam lamps. See Fig. .
-
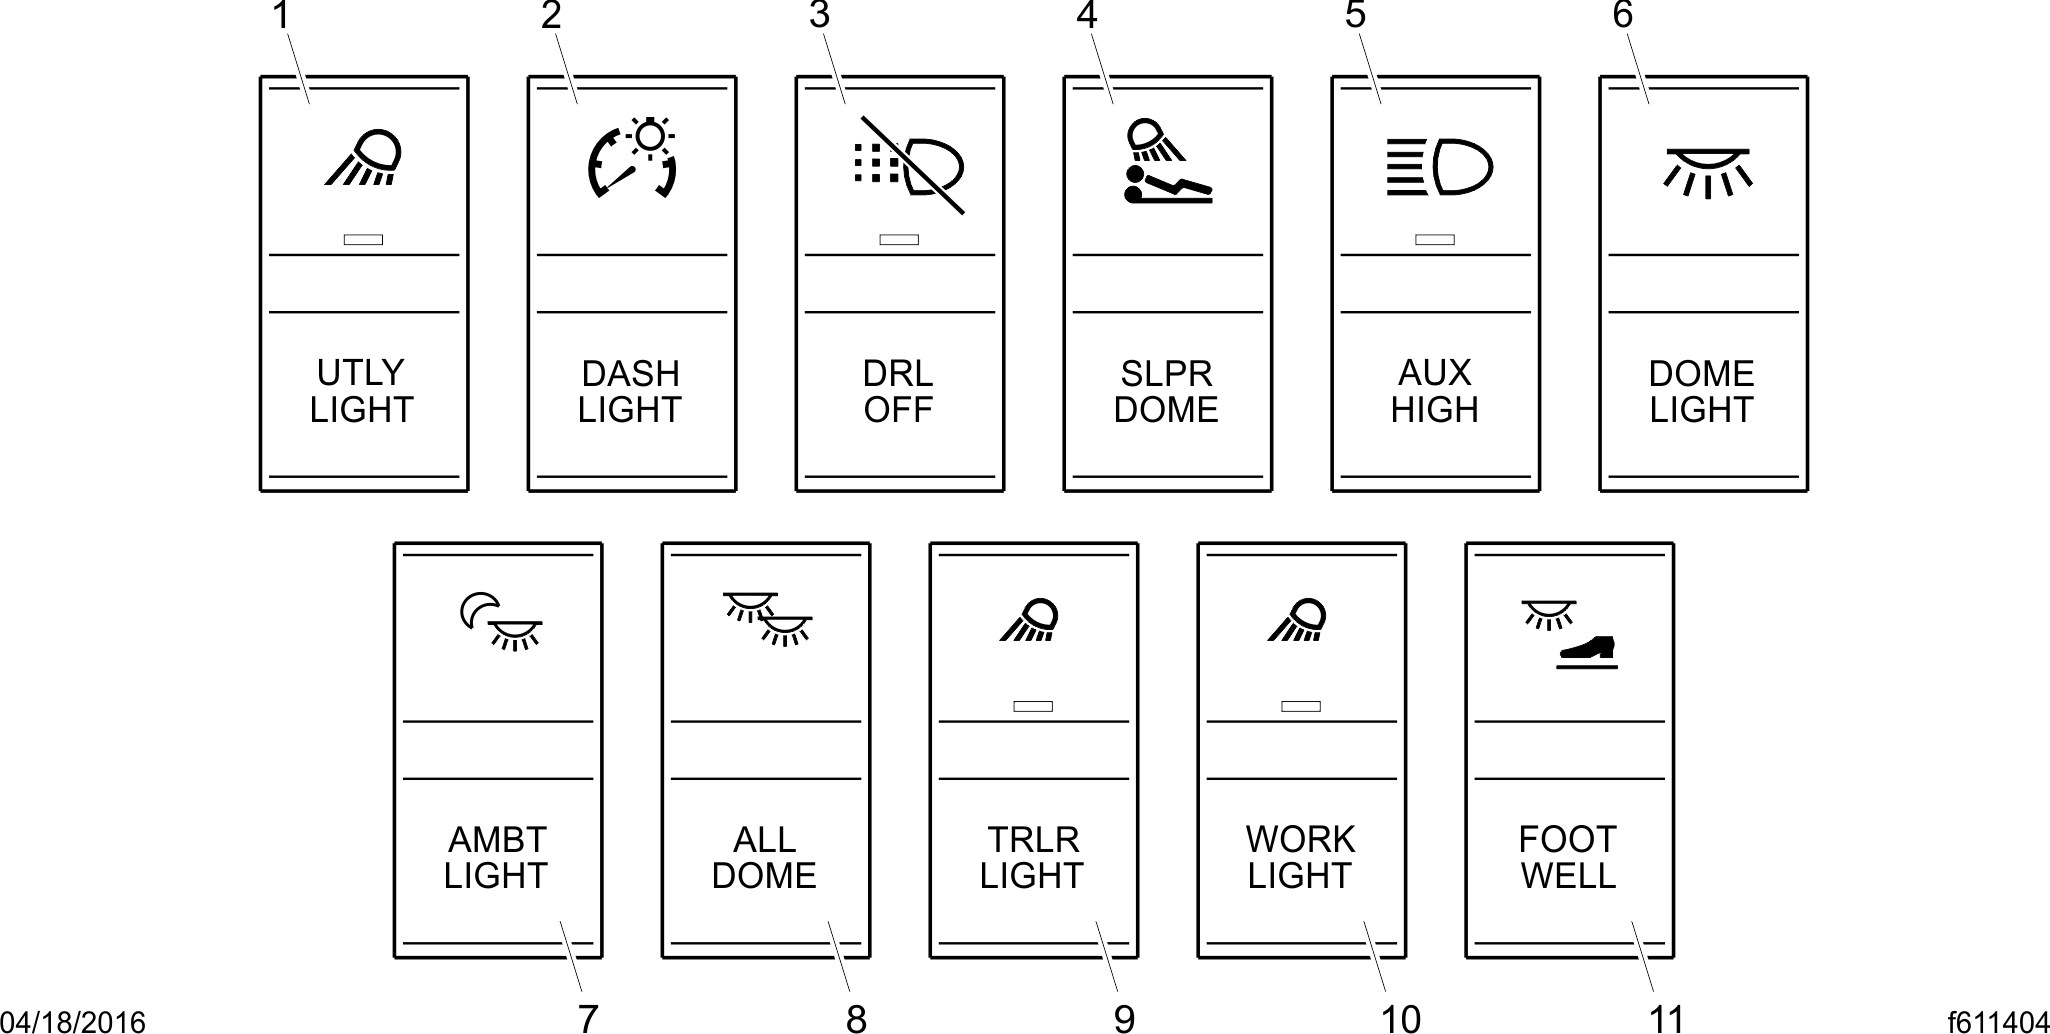
Utility Lamp Switch
-
Dash Lamp Switch (optional)
-
DRL Override Switch
-
Sleeper Dome Lamp Switch
-
Auxiliary High Beam Lamp Switch
-
Cab Dome Lamp Switch
-
Sleeper Ambient Lamp Switch (N/A)
-
All Dome Lamps Switch
-
Trailer Utility Lamp Switch
-
1Utility Lamp Switch
-
Foot Well Lamp Switch
Fig. 3, Dash-Mounted Light Switches
Daytime Running Lamps
If the vehicle is equipped with daytime running lamps (DRL), they are automatically activated when the ignition is switched on and the parking brake is released. The DRL turn off when the engine falls below 400 rpm, the parking brake is applied, or the headlamps are turned on.
Daytime running lamps are mandatory for vehicles domiciled in Canada. Vehicles domiciled in any other location may have an optional override switch. See Fig. , ref. 3. This is a momentary switch that enables the driver to deactivate the DRL.
Fog Lamps
Fog lamps are designed to reduce glare in foggy conditions. The marker lamps or headlamps must be on in order to turn the fog lamps on. Pull the headlamp switch outward to activate the fog lamps.
The hazard lamps can be activated regardless of the ignition switch position.
To activate the hazard lamps, press the center of the switch once. The switch blinks at the same rate that the hazard lamps flash. Press the switch again to turn them off. All the turn signals on the vehicle and trailer, as well as the turn signal indicators in the ICU, flash simultaneously when the hazard lamps are activated.
Hazard Warning Lamps
The hazard warning lamp switch is a red switch located on the dash switch panel. See Fig. for an overview of dash switches.

-
Steering Wheel Pod LH
-
Steering Wheel Pod RH
-
Reading Lamp
-
Trailer Air Supply
-
Hazard Lamps Switch
-
Power Outlets
-
Cup Holders
-
Park Brake
Fig. 4, Dash Features
Marker Lamps
To turn the marker lamps on, turn the headlamp switch clockwise past the off position. See Fig. .
Marker Interrupt Switch
The marker interrupt switch is located in the right-hand switch pod of the steering wheel for the ICUC system. See Fig. . Pressing it temporarily flashes the marker lamps.

-
Phone Hang-Up/Reject
-
Marker Interrupt
-
Phone Pick-Up
-
Headlamp Interrupt
-
Cruise Accelerate/Resume
-
Quick Access System Settings
-
Cancel Cruise Control
-
Cruise Decelerate/Set
Fig. 5, Steering Wheel Right-Hand Switch Pod - ICUC
Pretrip Light Test Switch
When the driver presses the pretrip light test switch, shown in Fig. , all exterior lights are activated so the driver can exit the vehicle and verify they are working properly. For additional information, see the Pre- and Post-Trip Inspections and Maintenance chapter.

Fig. 6, Pretrip Light Test Switch
Spotlamp
The spotlamp switch is located on the pivoting handle of the spotlamp. There may be a single spotlamp assembly mounted above the driver's door, or one above each door.
Utility Lamps
Utility lamps can be swivel-mounted on the upper half of the cab, mounted on the exhaust support, or flush-mounted on the back of the cab or sleeper. Press the upper half of the switch to turn the utility lamps on or off.
When activated, a red indicator light in the switch is illuminated.
Backup Lamps
Backup lamps activate only when the vehicle is in reverse, and are designed to be used while backing up at night.