Weekly Post-Trip Inspections and Maintenance
Warning: Washer fluids may be flammable and poisonous. Do not expose washer fluid to an open flame or any burning material, such as a cigarette. Always comply with the washer fluid manufacturer's recommended safety precautions.
- Check the windshield washer reservoir fluid level. The
reservoir is usually located near the right-hand frame rail. See Fig. .

-
Washer Fluid Filler Cap
Fig. 1, Windshield Washer Reservoir
-
- After resetting the air intake restriction indicator during
the daily pretrip inspection, check the indicator again with the engine
off.
- Check an indicator with graduations to see if air restriction
exceeds the value shown in Table .Check a go/no-go indicator without graduations to see if the colored bar shows through the clear window.
- If air restriction exceeds the maximum allowable value, operate the vehicle for one more day, making sure not to run the engine over rated rpm. See the engine operation manual for more information on rated rpm for your engine.
- If air restriction exceeds the maximum value again, replace the air cleaner. For instructions, see the Air Intake Group in the 108SD Plus and 114SD Plus Workshop Manual.
- Check an indicator with graduations to see if air restriction
exceeds the value shown in Table .
- Inspect water evacuation components.
- If equipped with optional pre-cleaners, inspect the
vacuator valves. Each pre-cleaner has two vacuator valves: one installed
on the pre-cleaner and one in the hood interior. See Fig. . Make sure
the lips of each valve are undamaged and pliable, free of debris,
and remain closed during inspection.

-
Vacuator Valve
Fig. 2, Hood Vacuator Valves (hood interior shown)
-
- Inspect the rain tray installed at the base of the windshield. Ensure that the seal on the forward edge of the rain tray is in good condition.
- Inspect the drain hoses installed on the rain tray. Both hoses should be securely attached to the rain tray and direct water down the aft side of the front fenders.
- If equipped with optional pre-cleaners, inspect the
vacuator valves. Each pre-cleaner has two vacuator valves: one installed
on the pre-cleaner and one in the hood interior. See Fig. . Make sure
the lips of each valve are undamaged and pliable, free of debris,
and remain closed during inspection.
- If the vehicle is equipped with an Allison automatic transmission, check the automatic transmission fluid level.
- Check for water in the fuel/water separator, if equipped.
- Place a suitable container under the fuel/water separator.
- If the engine is equipped with a built-in water separator, loosen the drain valve, and allow the water to run out. Close the drain valve, taking care not to overtighten it.
- Detroit/Racor Models : Turn the drain plug
counterclockwise to open it.

-
Lower Housing
-
Drain Valve
-
Inlet Port/Check Valve
-
12VDC Pre-Heater
-
120VAC Pre-Heater
-
Bypass Valve
-
Filter Element
-
Spring
-
Cover O-Ring
-
Clear Cover
-
Vent Cap O-Ring
-
Vent Cap
-
Collar
Fig. 3, DAVCO Fuel Pro 485
-
- Stop draining fluid when fuel begins to drain out.Detroit/Racor Models : turn the drain plug clockwise to close it.DAVCO Models : close the drain valve. Install and hand-tighten the vent cap.
Important: When draining fluid from a fuel/water separator, drain the fluid into an appropriate container and dispose of it properly. Many jurisdictions now issue fines for draining fuel/water separators onto the ground.
Note: A hose may be used to direct water into the container. On older DAVCO models, the drain valve has a 1/2-inch (12.7-mm) pipe with threads. Use a hose with a 1/2-inch pipe thread to fit correctly and open the drain valve by turning it one-quarter revolution. On new DAVCO models, the drain valve has a 3/4-inch (19-mm) slip-on hose connection; pipe threads are no longer used. Open the drain valve by turning it one to one-and-a-half revolutions.
- Inspect the steering components.
- Inspect tie rods, steering arms, and the drag link for signs of looseness (i.e., shiny spots or rust tracks).
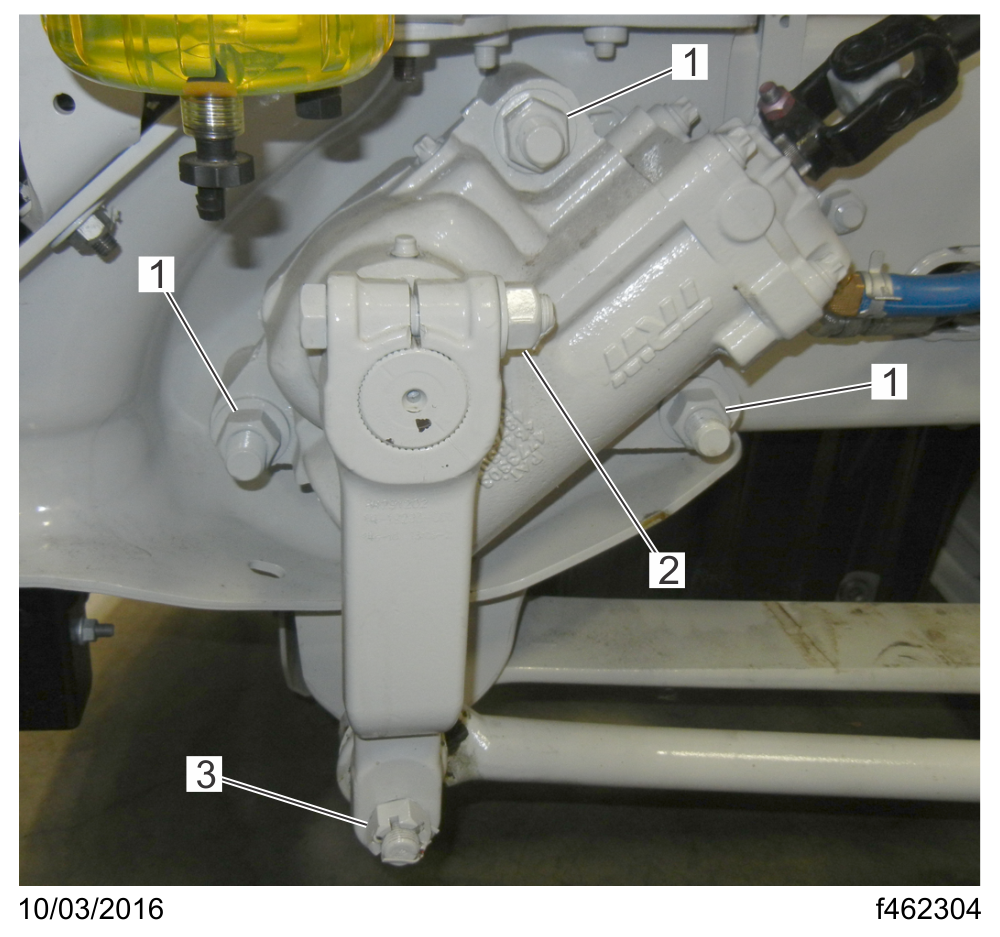
- Check the steering gear mounting bolts and pitman arm
nut, if equipped, for signs of looseness. See Fig. .
-
Steering Gear Mounting Bolts
-
Pitman Arm Pinch Bolt Nut (if equipped)
-
Drag Link Nut
Fig. 4, Standard Steering Gear Fasteners
-
- Check the drag link nuts for missing cotter pins.
- Inspect the steering intermediate shaft and end yokes for excessive looseness or other damage.
- Inspect the serpentine drive belts for signs of glazing, frayed edges, breaks, cracks, or oil contamination.
Notice: Do not drive with a drive belt that is visibly worn or damaged. If it fails, the lack of coolant flow could rapidly cause damage to engine components.