Holland Fifth Wheels Coupling
- Chock the front and rear of the trailer tires to prevent the trailer from moving.
- If equipped with a standard fifth wheel ,
check the surface of the fifth wheel for a liberal coating of grease.If equipped with a no- or low-lube fifth wheel plate ensure there are no sharp edges, nuts, bolts, gouges, or large holes along the leading edge of the trailer or the path of the fifth wheel, as shown in Fig., and that any upper coupler residual grease is free of coarse grit.

-
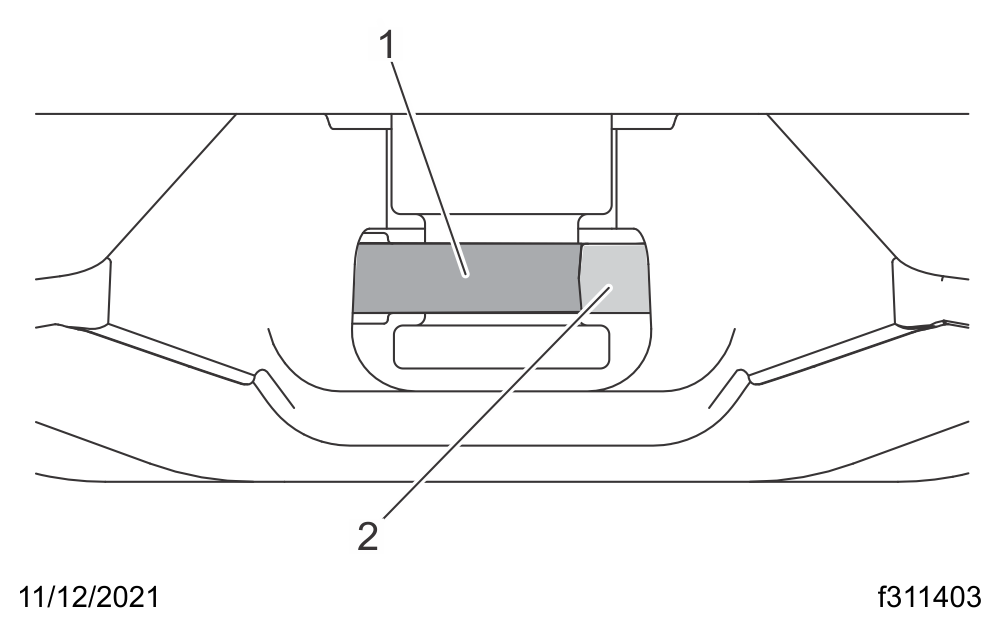
Keep the direct path of fifth wheel and six inches to either side free of large holes and gouges.
-
Keep bolts and nuts clear of the bolster plate.
Fig. 1, Path of a Fifth Wheel
-
- Ensure the fifth wheel jaw is fully open and the release handle is in the unlocked position.
- Make sure the fifth wheel top plate is tilted rearwards with the ramps down and resting on the tilt stops.
- Position the tractor so that the center of the fifth wheel
is in line with the trailer kingpin as shown in The
kingpin should be in a position to enter the throat of the locking
mechanism.

Fig. 4, Positioning the Tractor
- Adjust the trailer height if required.
For a standard fifth wheel plate , the trailer should contact the fifth wheel approximately 4 to 8 inches (10 to 20 cm) behind the fifth wheel pivot as shown in Fig..

-
Fifth wheel must lift trailer
-
Adjust trailer height
-
Ramps tilted down
-
4 to 8 inches
Fig. 5, Trailer Connection Point, Standard Fifth Wheel
For a no- or low-lube fifth wheel plate , the fifth wheel must slide freely under the trailer; the trailer should contact the fifth wheel at the pivot point shown in Fig..
-
Adjust trailer height
-
Ramps tilted down
Fig. 6, Trailer Connection Point, Low-Lube Fifth Wheel
-
- With the fifth wheel lock opening aligned with the trailer
kingpin, back the tractor slowly toward the trailer. After sliding
under the trailer, stop to prevent from hitting the
kingpin, then resume backing up slowly until the fifth wheel locks.On a standard fifth wheel, the fifth wheel must lift the trailer.On a no- or low-lube fifth wheel, do not lift the trailer. Lifting the trailer with a no- or low-lube fifth wheel may damage the fifth wheel plate.
- Apply the tractor parking brakes.
- Perform a coupling inspection.
- Verifying a Holland FW35/31 fifth wheel is locked:
-
Verify that there is no gap between the bottom of the trailer and the fifth wheel as shown in Fig..

Fig. 7, No Gap Between Fifth Wheel and Trailer
-
Verify that the kingpin is securely locked as shown in Fig..

-
Verify there is a 1/4 inch (6.35 mm) or less gap.
-
Verify that the locks are completely closed around the kingpin.
Fig. 8, Kingpin Locked in Holland FW35/31 Fifth Wheel Jaws
-
-
Verify that the nut and washer are snug against the fifth wheel as shown in Fig.

-
Verify the nut and washer are snug against the fifth wheel
Fig. 9, Nut and Washer Snug Against Locked Holland FW35/31
-
-
- Verifying a Holland FWAL is locked:
-
Verify that there is no gap between the bottom of the trailer and the fifth wheel as shown in Fig.
-
Verify that the kingpin is securely locked as shown in Fig.
-
Lock Completely Closed Around Kingpin
-
Lock Retainer Securing Lock
Fig. 10, Holland FW17 or FWAL Lock Closed Around Kingpin
-
-
Verify that the handle is fully retracted as shown in Fig.

-
Handle
-
Locking Plate Rear Notch (behind top of bracket)
-
Locking Plate Front Notch (behind arm of bracket)
Fig. 11, Holland FWAL Handle Fully Retracted
-
-
- Verifying a Holland FW35/31 fifth wheel is locked:
- Release the tractor parking brakes.Test for kingpin lockup by slowly inching the tractor forward, pulling the trailer against the chocks.
- After lockup is completed, connect the tractor-to-trailer air system lines and the electrical cable to the trailer. Take care to prevent dirt or foreign material from entering the air system lines.
- Charge the air brake system with air, checking that the air connections do not leak.
- With the trailer wheels chocked and the brakes set, check for clearance between the kingpin and the fifth wheel jaws by moving the tractor forward and backward against the locked kingpin. If slack is present, uncouple the trailer and have the fifth wheel inspected and adjusted by a certified technician.


Notice: Attempting to couple at the wrong height may cause improper coupling, which could result in damage to the fifth wheel or kingpin.
Warning: A visual inspection is required by law.
Some improper couplings can pass a pull test. Sound is not reliable.
Get out of the cab and look.
Incorrect coupling could cause the trailer to disconnect, possibly resulting in serious personal injury or death.
Notice: Always make sure the connection hanger keeps the trailer air hoses and electrical cables positioned so that they do not rub on anything. Rubbing may wear through hoses or cables, resulting in air leaks, or exposed or broken wires, potentially affecting trailer brake or electrical systems.
Warning: Incorrect fifth wheel lock adjustment could cause the trailer to disconnect, possibly resulting in serious personal injury or death.